How to edit Lumix DC-S1RII video in DaVinci Resolve 20
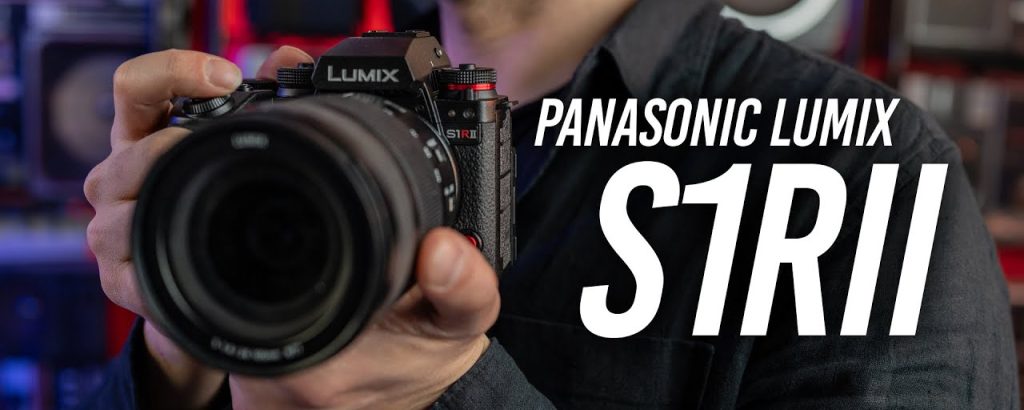
Last month, some foreign friends came to visit my family. I took them to explore the city’s famous tourist attractions. To capture those unforgettable moments, I borrowed a Panasonic Lumix DC-S1RII from a colleague. This remarkable camera allowed me to shoot stunning 4K and 1080p videos with incredible detail and dynamic range. Recently, I wanted to edit these video files in DaVinci Resolve 20 for further post-production and then share the final results with my friends. However, I ran into trouble when trying to import my Lumix footage directly into DaVinci Resolve 20. The playback was choppy, and some clips wouldn’t load at all. So, who can help me solve these problems?
The Challenge: Lumix DC-S1RII Video Compatibility with DaVinci Resolve 20
Panasonic released the Lumix DC-S1RII as a high-resolution full-frame mirrorless camera aimed at professional photographers and videographers. It features a 47.3-megapixel sensor, advanced phase-detection autofocus, and the ability to record high-quality video in various codecs, including MP4, MOV, and H.265/HEVC at up to 8K resolution. Many content creators expect to edit these videos seamlessly in DaVinci Resolve 20, which is one of the most powerful free and paid color grading and editing suites available today.
Unfortunately, editing Lumix DC-S1RII video files directly in DaVinci Resolve 20 is not always straightforward. Why? Because DaVinci Resolve has specific requirements for DaVinci Resolve supported video format. While Resolve supports many codecs, certain Lumix recordings—especially those using Long GOP compression, 10-bit 4:2:2 H.265, or variable frame rates—can cause import errors, stuttering, or even crashes. The official Blackmagic Design documentation states that DaVinci Resolve works best with intra-frame codecs like ProRes, DNxHR, or uncompressed formats, rather than long-GOP H.264/H.265 from consumer cameras. That’s why your Lumix DC-S1RII footage may fail to play smoothly on the timeline.
The Solution: Convert Lumix Video to a DaVinci-Resolve-Friendly Format
To ensure a smooth editing workflow, you need to transcode your Lumix DC-S1RII video files into a codec that DaVinci Resolve natively loves. The most recommended format for Resolve is Apple ProRes 422 or ProRes 4444 in a MOV container, or Avid DNxHR in MXF. These are lossless or near-lossless editing codecs that provide real-time performance without dropped frames.
This is where a dedicated converter comes in. You have come to the right place. Acrok Video Converter Ultimate – a professional Lumix Video Converter – can get the job done quickly and easily. This all-in-one tool is designed to handle high-resolution 4K and 8K videos from modern cameras like the Lumix DC-S1RII. It can convert your original MP4 or MOV files into DaVinci Resolve supported video format with just a few clicks.
Key Features of Acrok Video Converter Ultimate
- Optimized presets for DaVinci Resolve – Includes output profiles like “Apple ProRes 422 (.mov)”, “Apple ProRes 4444 (.mov)”, and “Avid DNxHR (*.mxf)”.
- Preserves original quality – Uses intelligent encoding to maintain detail and color accuracy.
- Batch conversion – Convert dozens of Lumix clips at once.
- Adjustable parameters – Set resolution, frame rate, bitrate, and audio codec.
- Supports all Lumix models – Including DC-S1RII, S5II, GH6, G9II, and more.
Free download Acrok Video Converter Ultimate to have a try.
Step-by-Step Tutorial: Convert Lumix DC-S1RII Video for DaVinci Resolve 20
Follow these three simple steps to convert your Lumix footage into a DaVinci Resolve 20 friendly format.
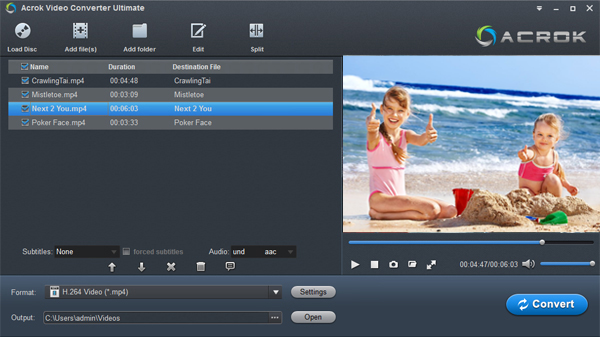
Step 1: Load Your Lumix DC-S1RII Video Files
Launch Acrok Video Converter Ultimate. You can either:
- Click the “Add Files” button and browse for your Lumix MP4 or MOV clips, or
- Simply drag and drop the video files directly into the software interface.
The program supports batch conversion, so feel free to add an entire folder of clips from your day of sightseeing.
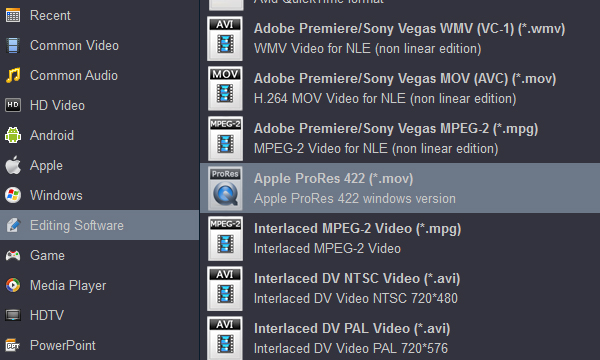
Step 2: Choose the Optimal Output Format for DaVinci Resolve 20
Click on the “Format” bar to open the output format list. Navigate to the “Editing Software” category, then select “Final Cut Pro / DaVinci Resolve” section. From there, choose:
- “Apple ProRes 422 (*.mov)” – Ideal for most 1080p and 4K editing workflows. This is highly recommended for DaVinci Resolve 20.
- Or “Apple ProRes 4444 (*.mov)” – Use this if you need alpha channels or maximum color fidelity for VFX work.
Tip: If you want to add creative effects before editing, you can click the “Editing” icon to trim, crop, add watermarks, or even apply 3D effects to your videos.
Step 3: Start the Conversion
Click the big “Convert” button at the bottom. Acrok Video Converter Ultimate will begin transcoding your Lumix DC-S1RII video into DaVinci Resolve supported video format (ProRes MOV). Depending on your computer’s hardware and the length of the clips, this process usually takes just a few minutes per gigabyte.
Once the conversion is complete, click the “Open” button on the main interface. A folder will pop up showing your newly converted ProRes MOV files.
How to Import and Edit the Converted Video in DaVinci Resolve 20?
- Launch DaVinci Resolve 20 on your computer.
- Create a new project or open an existing one.
- Go to the Media page and click “Import Media” or simply drag your converted ProRes MOV files into the media pool.
- Drag the clips onto the timeline. You will notice instant smooth playback, no dropped frames, and full scrubbing responsiveness.
- Edit, color grade, add effects, and export your final masterpiece to share with your friends.
Additional Tips for a Smooth Lumix-to-Resolve Workflow
- Keep original files backed up – Never convert your only copy. Store original Lumix clips on an external drive.
- Match project settings – Set your DaVinci Resolve timeline to the same frame rate as your source footage (e.g., 23.976, 24, 25, 30, 50, or 60 fps).
- Use optimized media – Even after conversion, you can generate “Optimized Media” inside Resolve for an extra performance boost.
- Update DaVinci Resolve – Blackmagic regularly adds new codec support. Make sure you’re running DaVinci Resolve 20.3.2 or later.
Final Verdict: Don’t Let Format Incompatibility Ruin Your Edit
The Panasonic Lumix DC-S1RII is a fantastic camera capable of producing breathtaking video. But to edit that video smoothly in DaVinci Resolve 20, you need to ensure you’re using a DaVinci Resolve supported video format. Instead of fighting with stuttering timelines or failed imports, Acrok Video Converter Ultimate – the reliable Lumix Video Converter – offers a one-click solution.
By converting your Lumix DC-S1RII footage to Apple ProRes MOV, you guarantee a seamless editing experience in DaVinci Resolve 20. The process is fast, the quality is preserved, and your creative workflow remains uninterrupted.
So next time you face the “Media Offline” or “Unsupported Codec” error in DaVinci Resolve, remember: Acrok Video Converter Ultimate has you covered.